Server Sent Event, 줄여서 SSE는 웹 서버에서 웹 브라우저로 이벤트를 푸시하고 싶을 때 유용하게 사용할 수 있다. 스프링 웹플럭스를 사용하면 간단하게 SSE를 구현할 수 있다. 이 글에서는 간단한 예를 이용해서 스프링 웹플럭스로 SSE를 어떻게 구현하는지 살펴보자.
[참고] 스프링 리액터에 대한 내용은 스프링 리액터 Reactor 기초 글 목록 글을 참고한다.
프로젝트 생성
먼저 스프링 부트 프로젝트를 생성한다. 이 글에서는 메이븐 프로젝트를 예로 사용했으며 pom.xml 파일은 다음과 같다. 웹플럭스 사용을 위해 spring-boot-starter-webflux를 추가했다.
<?xml version="1.0" encoding="UTF-8"?>
<project xmlns="http://maven.apache.org/POM/4.0.0" xmlns:xsi="http://www.w3.org/2001/XMLSchema-instance"
         xsi:schemaLocation="http://maven.apache.org/POM/4.0.0 https://maven.apache.org/xsd/maven-4.0.0.xsd">
    <modelVersion>4.0.0</modelVersion>
    <parent>
        <groupId>org.springframework.boot</groupId>
        <artifactId>spring-boot-starter-parent</artifactId>
        <version>2.2.1.RELEASE</version>
        <relativePath/> <!-- lookup parent from repository -->
    </parent>
    <groupId>sse-demo</groupId>
    <artifactId>sse-demo</artifactId>
    <version>0.0.1-SNAPSHOT</version>
    <name>sse-demo</name>
    <description>Demo project for Spring Boot</description>

    <properties>
        <java.version>13</java.version>
    </properties>

    <dependencies>
        <dependency>
            <groupId>org.springframework.boot</groupId>
            <artifactId>spring-boot-starter-thymeleaf</artifactId>
        </dependency>
        <dependency>
            <groupId>org.springframework.boot</groupId>
            <artifactId>spring-boot-starter-webflux</artifactId>
        </dependency>

        <dependency>
            <groupId>org.projectlombok</groupId>
            <artifactId>lombok</artifactId>
            <optional>true</optional>
        </dependency>

        <dependency>
            <groupId>org.springframework.boot</groupId>
            <artifactId>spring-boot-devtools</artifactId>
            <optional>true</optional>
        </dependency>
    </dependencies>

    <build>
        <plugins>
            <plugin>
                <groupId>org.springframework.boot</groupId>
                <artifactId>spring-boot-maven-plugin</artifactId>
            </plugin>
        </plugins>
    </build>

</project>
SSE 서버 구현
SSE 서버 구현은 간단하다. 요청 처리 메서드에서 ServerSentEvent를 제공하는 Flux를 리턴하기만 하면 된다. 다음은 구현 예이다.
@RestController
public class SimpleSSEApi {

    @GetMapping("/stocks/{code}")
    public Flux<ServerSentEvent<Stock>> stocks(@PathVariable("code") String code) {
        return Flux.interval(Duration.ofSeconds(1))
                .map(t -> Stock.builder()
                        .code(code)
                        .value(randomValue())
                        .build())
                .map(stock -> ServerSentEvent.builder(stock).build());
    }

    private int randomValue() {
        return ThreadLocalRandom.current().nextInt(1000) + 10000;
    }
}
이 코드에서 stocks()가 리턴하는 Flux는 1초 간격으로 ServerSentEvent를 제공한다. ServerSentEvent.builder() 메서드는 클라이언트에 전송할 이벤트 데이터를 받는다. 위 코드에서는 임의의 value 값을 갖는 Stock 객체를 이벤트 데이터로 사용했다.
자바 스크립트 구현
자바 스크립트는 EventSource를 이용해서 서버가 보내는 이벤트를 수신할 수 있다. 먼저 첫 화면 요청을 처리할 컨트롤러를 만든다. 이 컨트롤러는 '/' 요청이 오면 뷰로 index를 사용한다.
@Controller
public class IndexController {
    @GetMapping("/")
    public String index() {
        return "index";
    }
}
다음은 index 뷰로 사용할 index.html 파일이다. src/main/resxources/templates 폴더에 위치한 thymeleaf 파일이다.
<!DOCTYPE html>
<html lang="ko">
<head>
    <meta charset="utf-8">
    <title>단순 SSE</title>
</head>
<body>
    <div id="stockValue">
    </div>

    <script src="https://code.jquery.com/jquery-3.4.1.slim.min.js"></script>
    <script type="text/javascript">
        var source = null;
        function start() {
            source = new EventSource("/stocks/1234");
            console.log("create EventSource");
            source.onmessage = function(ev) {
                console.log("on message: ", ev.data);
                $("#stockValue").text(ev.data);
            };
            source.onerror = function(err) {
                console.log("on err: ", err);
                stop();
            };
        }
        function stop() {
            if (source != null) {
                source.close();
                console.log("close EventSource");
                source = null;
            }
        }

        $(document).ready(function(){
            start();
        });
        $(window).on("unload", function () {
            stop();
        });
    </script>
</body>

</html>
EventSource는 SSE를 위한 표준 API이다. EventSource 객체를 생성할 때 SSE를 받을 서버 경로를 입력한다. 위 코드에서는 /stocks/1234를 경로로 지정했다.
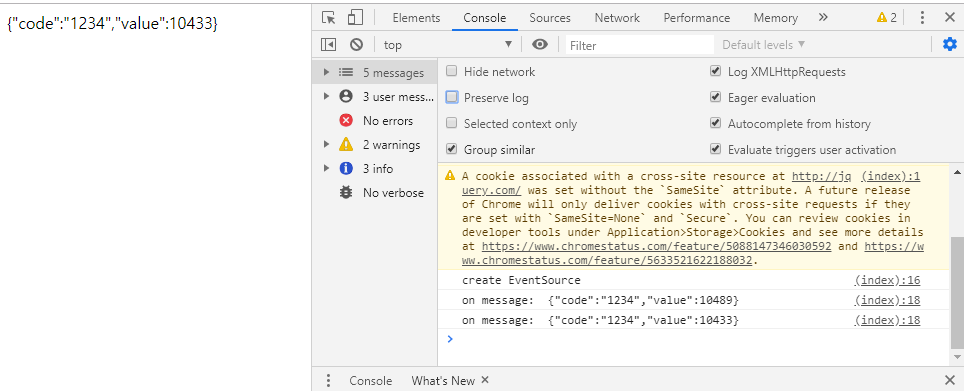
EventSource#onmessage는 서버가 이벤트를 전송할 때 불린다. onmessage에 전달한 이벤트 처리 함수는 서버가 이벤트를 전송할 때마다 인자로 이벤트를 받는다. 서버가 전송한 데이터는 이벤트 객체의 data 속성에 담긴다. 예제에서는 서버가 전송한 데이터를 stockValue 영역에 표시하게 구현했다.
EventSource#onerror는 에러가 발생했을 때 불린다. 예제에서는 에러가 발생하면 EventSource#close()를 이용해서 연결을 끊도록 했다.
실행 결과
mvnw spring-boot:run 명령어로 서버를 실행한 뒤에 http://localhost:8080으로 접속해보자. 그러면 1초마다 stockValue 영역의 값이 바뀌는 것을 볼 수 있다.

서버의 로그 레벨을 debug로 변경하면 1초 간격으로 메시지를 생성하는 로그를 볼 수 있다.
2019-12-06 08:10:22.609 DEBUG 37036 --- [     parallel-5] o.s.http.codec.json.Jackson2JsonEncoder  : [0a3a9b2d] Encoding [ssedemo.Stock@7769d30b]
2019-12-06 08:10:23.609 DEBUG 37036 --- [     parallel-5] o.s.http.codec.json.Jackson2JsonEncoder  : [0a3a9b2d] Encoding [ssedemo.Stock@5efe1c65]
2019-12-06 08:10:24.609 DEBUG 37036 --- [     parallel-5] o.s.http.codec.json.Jackson2JsonEncoder  : [0a3a9b2d] Encoding [ssedemo.Stock@5eb98269]
2019-12-06 08:10:25.609 DEBUG 37036 --- [     parallel-5] o.s.http.codec.json.Jackson2JsonEncoder  : [0a3a9b2d] Encoding [ssedemo.Stock@67b3812f]
2019-12-06 08:10:26.609 DEBUG 37036 --- [     parallel-5] o.s.http.codec.json.Jackson2JsonEncoder  : [0a3a9b2d] Encoding [ssedemo.Stock@5e7be759]
2019-12-06 08:10:27.609 DEBUG 37036 --- [     parallel-5] o.s.http.codec.json.Jackson2JsonEncoder  : [0a3a9b2d] Encoding [ssedemo.Stock@70c8d5c7]
2019-12-06 08:10:28.609 DEBUG 37036 --- [     parallel-5] o.s.http.codec.json.Jackson2JsonEncoder  : [0a3a9b2d] Encoding [ssedemo.Stock@6270bb7d]
정리
이 글에서는 간단하게 스프링 웹 플럭스로 SSE를 구현하는 방법을 살펴봤는데 다음 글(스프링 웹플럭스(WebFlux) SSE(Server Sent Event) 구현 2)에서는 조금 더 현실적인 예제를 만들어보자.
참고자료


